
To learn self-hosting as a developer, take one small application through the full operating cycle on a rented VPS: run it in Docker, secure the server, serve it over HTTPS, automate releases, restore a backup, and monitor it from outside. Use disposable data until the restore works.
I self-host Katabench, a .NET coding platform with a few thousand users, along with my internal tools and a Grafana observability stack. This guide follows the order I teach. Each stage below ends with a check you can run, so you know when to move on.
What Is Self-Hosting?
Self-hosting means running software on infrastructure you manage instead of paying a platform to run it for you. That can be a computer at home, but for a developer shipping a web application it's usually a rented virtual private server (VPS). The provider operates the physical hardware, and you choose the operating system, the runtime, and everything above it.
| Home server | Rented VPS | Managed platform | |
|---|---|---|---|
| You operate | Hardware, power, network, OS, and apps | OS and apps | Your app and its configuration |
| Public access | Port forwarding or a tunnel | A public IP by default | Handled for you |
| Starting cost | Hardware you may already own | Around $6 per month for 2 cores and 4 GB at Hetzner | Priced per app or per resource |
| Best for | Household services and learning hardware | Learning to deploy and run web applications | Shipping without operating servers |
If you want to run services from your own hardware, Cloudflare Tunnel solves the networking part. The rest of this guide assumes a VPS, because it lets you focus on your application instead of your home connection.
Is Self-Hosting Worth Learning?
Managed services from Azure or AWS are convenient and reliable, and I've used them on many projects. You pay for the infrastructure, the operational work, and the provider's margin. Self-hosting can be around 10 times cheaper for the same setup, and you pay the difference with your time.
Updates, access, backups, and recovery all become your job. A single server is also a single point of failure, so a hardware fault takes everything on it offline.
Self-hosting suits an application that can accept some downtime and has someone who owns the server. Stay on a managed service if nobody can own recovery, or if your uptime target is higher than one machine can deliver.
What Should You Self-Host First?
Start with an application you already understand, with a web interface and a database. You need something that can save a record, read it back, and report which version is running. Learning a new framework at the same time adds another possible explanation every time a request fails.
A side project or a small internal tool works well. So does a paid tool you could replace, which is how I ended up running my own transcription app instead of renewing a $120 subscription.
Leave email for later, because deliverability is its own discipline. Keep real customer data off the server until you have restored a backup at least once.
The Self-Hosting Roadmap
Work through these in order. Each stage has a concrete result that tells you it's finished.
| Stage | What you learn | You are done when |
|---|---|---|
| 1. Docker | Images, containers, Compose, volumes | The app and database start from one file, and data survives recreating the containers |
| 2. Server access | SSH keys, a firewall, a non-root user | A new session logs in with a key and password login fails |
| 3. Private administration | A VPN or SSH tunnel | SSH and the deployment panel work privately and time out from the public internet |
| 4. Deployment | DNS, a reverse proxy, HTTPS, a deployment platform | The real domain serves the app with a valid certificate and no database port is published |
| 5. Releases | CI, image tags, rollback | You can name the commit running in production and redeploy the previous image |
| 6. Backups | Off-site dumps and restores | A stored backup restores into a scratch database and your data checks pass |
| 7. Monitoring | External checks, alerts, maintenance | A controlled failure sends an alert you actually receive |
Stage 1: Run the App in Docker Before You Touch the Server
Get the application and its database running from one Compose file on your own machine. If you work in .NET, Docker for .NET developers covers the image and Compose basics, and you can skip the Dockerfile entirely with the SDK.
You need to know three things here: an image can be rebuilt, a container can be replaced, and a volume holds the data that must survive. Prove the last one before moving on:
docker compose up -d --wait
# Save a record through the app, then replace the containers.
docker compose down
docker compose up -d --wait
The record should still be there.
Running docker compose down -v deletes the volume too, so try that only with data you can lose.
Stage 2: Lock Down Server Access
Create an SSH key on your own machine and upload only the public half:
ssh-keygen -t ed25519 -a 64 -f ~/.ssh/prod_ed25519
Then check what the SSH server actually applies, because override files can change the result:
sudo sshd -T | grep -E '^(permitrootlogin|passwordauthentication) '
A fresh openssh-server package on Ubuntu 24.04 reports this:
permitrootlogin without-password
passwordauthentication yes
Your provider's image may differ, which is why you check.
You want no on both lines after you have created a separate admin user with sudo access.
Test that login in a second terminal before you close the first, and keep the provider's recovery console available.
Put a firewall at the provider level that allows ports 80 and 443, plus SSH from your IP address.
A host firewall is not enough here, because Docker can route published ports around UFW.
The Ubuntu server hardening checklist has the full list for this stage.
Stage 3: Keep Administration Private
Users need ports 80 and 443.
You are the only one who needs SSH and the deployment panel, so they don't belong on the public internet.
A Tailscale network handles this, and Katabench runs the same idea on Headscale. Joining a private network doesn't close a public port by itself, so remove the public firewall rule once private access works.
Your check runs from outside the private network:
curl -m 5 http://your-server-ip:3000
It should time out. A response means your panel is reachable by anyone who finds it.
Stage 4: Deploy Behind a Reverse Proxy
Before you automate anything, be able to explain how a browser reaches your application. DNS resolves the hostname, a reverse proxy accepts HTTPS traffic, and the proxy forwards the request to your container. The application reaches its database over an internal network that the proxy never touches.
This is the single-server system I teach, with public traffic, private administration, and recovery kept apart:
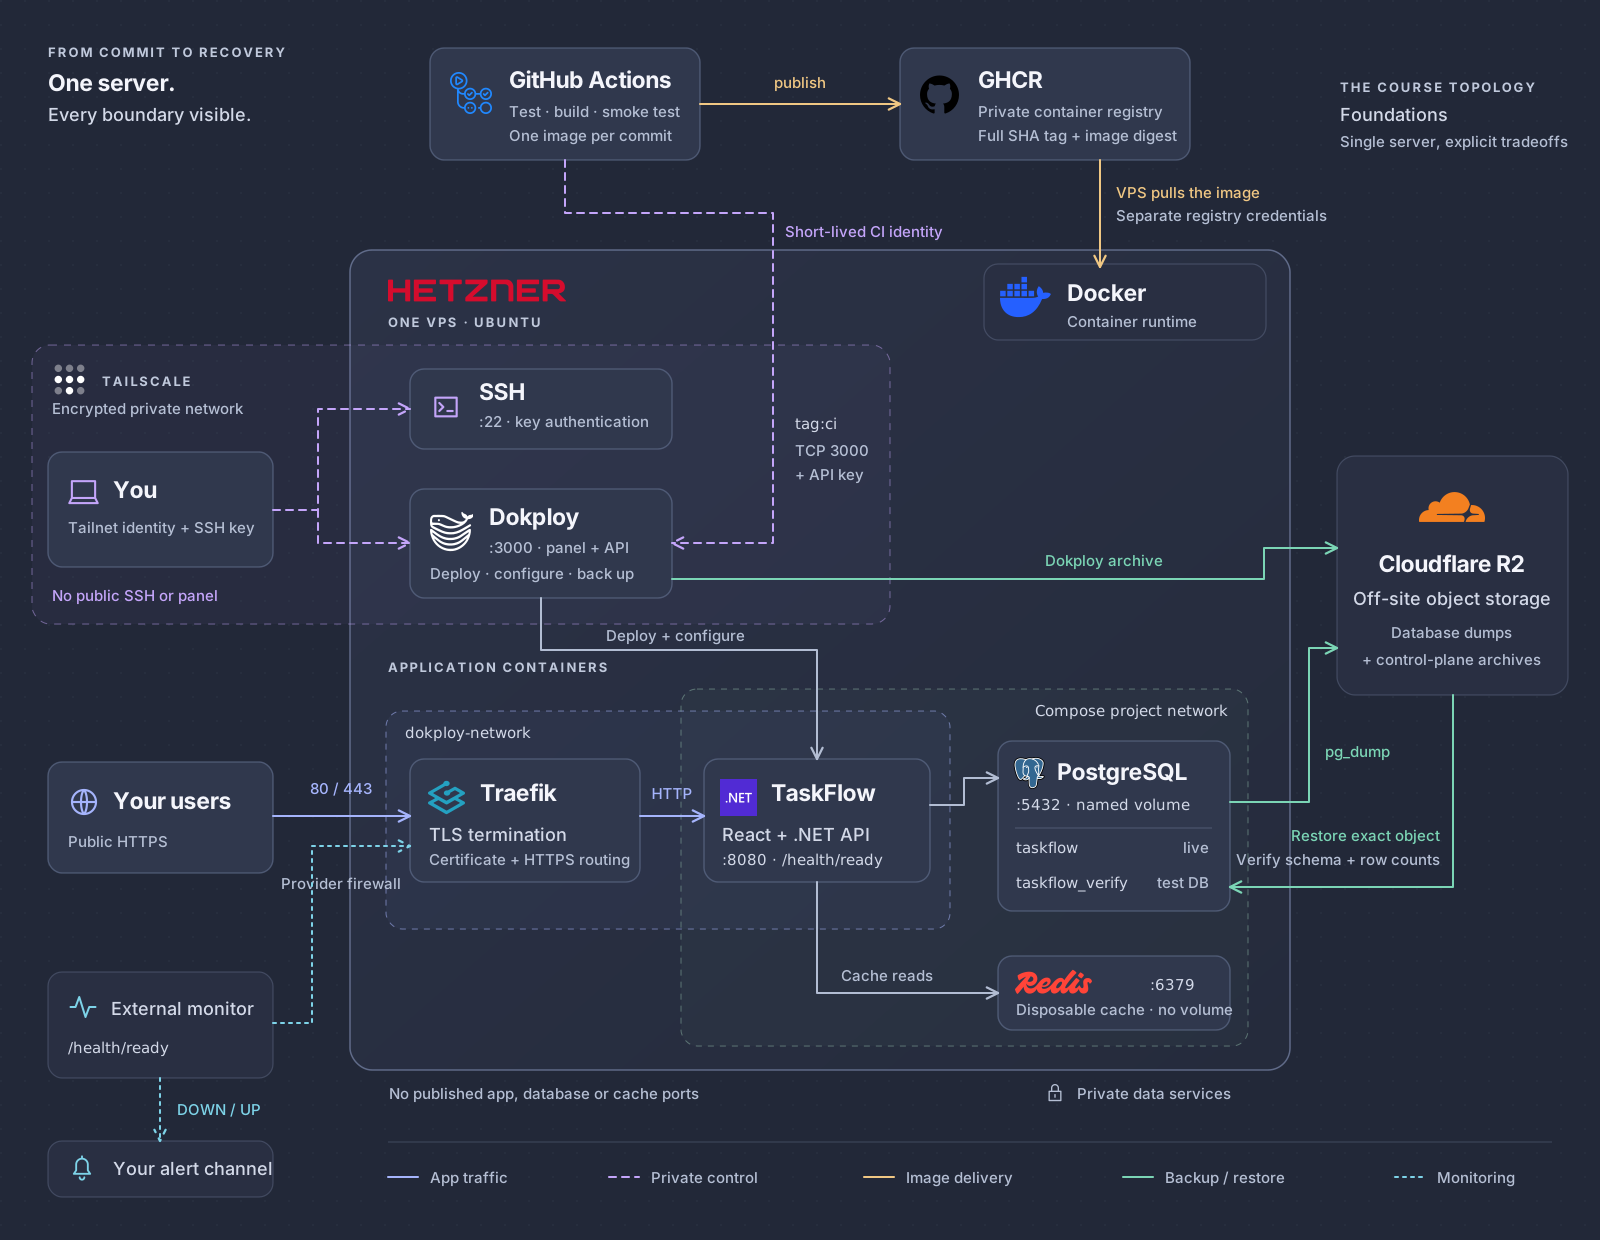
A deployment platform saves you from writing all of this by hand. I use Dokploy, which configures Traefik routing and certificates for you, and Dokploy vs Coolify compares the two main options. You still need to know your application's port, configuration, and dependencies, and this .NET walkthrough goes through them step by step with a runnable sample.
Check the whole path at once by requesting a readiness endpoint through the public domain:
curl -i https://app.example.com/health/ready
A 200 proves the certificate, the route, the application, and the database connection all work together.
Stage 5: Automate Releases
Once a manual deployment makes sense, automate it. Test the code, build one image, tag it with the commit SHA, and deploy that exact image. That previous tag then becomes your rollback target, because you never have to rebuild old code during an incident.
A deployment can report success while the old version keeps running. Expose the build's commit from the application and compare it after each release:
curl -fsS https://app.example.com/version.json
Practice going back to the previous image, and check database compatibility first. Reverting an image doesn't undo a migration, and an older application may not work with the newer schema.
Stage 6: Practice Restoring a Backup
A Docker volume survives a container replacement, but it still lives on the same disk as everything else. Write down every durable store your application uses, including uploaded files, and copy the data off the server on a schedule.
Then restore a stored backup into a scratch database and run the queries your application needs.
This Postgres restore drill has a runnable sample, and it shows why the obvious quick check isn't enough: pg_restore --list exits 0 on a backup cut in half.
Restoring beside the original database checks the backup and the procedure. It doesn't prove you can rebuild on a replacement server, which is a separate exercise.
Stage 7: Monitor From Outside the Server
Run your uptime check from outside the VPS, or a server outage takes the monitor down with it. Point it at your readiness endpoint, then cause a failure and confirm the alert reaches you.
Docker's own status won't tell you enough.
With the database stopped in my sample, Docker still reported the API container as healthy while /health/ready returned 503.
Add a recurring check for updates, disk usage, backup freshness, and alert delivery. The VPS deployment checklist has the commands for all of it.
How Much Does It Cost to Learn Self-Hosting?
Very little, if you clean up after yourself. A 2-core, 4 GB server costs around $6 per month at Hetzner, and that's enough to run a control plane, an application, Postgres, and Redis together. Most providers bill by the hour, so a practice server you delete afterwards can cost cents.
You also need a domain, or a subdomain of one you already own. Tailscale, GitHub Actions, Cloudflare R2, and UptimeRobot all have free plans. Check current prices before you start, and remember that your time is the largest cost.
Summary
Pick one small application and take it through all seven stages on a single VPS, with disposable data. The order matters because each stage depends on the last.
My self-hosting course for developers teaches this sequence on one server with Dokploy and Tailscale, and the first lessons are free.
Thanks for reading.
And stay awesome!
Frequently Asked Questions
What is the best way to learn self-hosting?
Take one small application with a database through the full operating cycle on a rented VPS: run it in Docker, lock down access, serve it over HTTPS, automate releases, restore a backup, and monitor it from outside the server. Use disposable data until the restore works.
Do I need to know Linux to self-host?
You need to be comfortable running terminal commands, editing files, and using Git, and you should understand how a web application talks to its database. You can learn Linux administration during the project, starting with SSH, a firewall, and a non-root user.
Is a rented VPS really self-hosting?
Yes. Self-hosting means running software on infrastructure you manage. The provider operates the physical hardware, and you are responsible for the operating system, updates, access, backups, and recovery. You do not need a server at home.
What should I self-host first?
Start with an application you already understand that has a web interface and a database, such as a side project or a small internal tool. Leave email and anything holding real customer data until you have restored a backup at least once.
How much does it cost to learn self-hosting?
A 2-core, 4 GB VPS costs around $6 per month at Hetzner, and most providers bill by the hour, so a short practice session can cost cents if you delete the server afterwards. You also need a domain. Tools like Tailscale, GitHub Actions, and Cloudflare R2 have free tiers. Check current prices before you start.
Is self-hosting worth it for developers?
It is worth it when you can accept some downtime and have someone who owns updates and recovery. Self-hosting can cost a fraction of managed cloud services, and you pay the difference with your own time. It also teaches you how your application actually runs in production.
